My Thoughts, Ideas, and Observations |

|
|
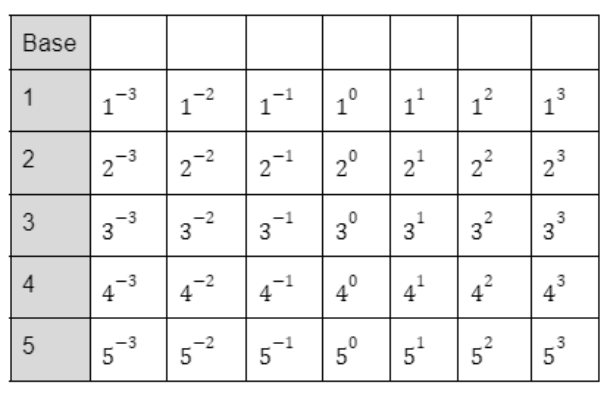
I love my lesson on introducing negative and zero exponents now that I added in the visuals. Check out the lesson here. I also like the lesson I do after where I use smudge math to get them to think about what the exponents should be. BUT, I have come to realize that I need a lesson between the two. My students need more time to work with negative and zero exponents, to play with the patterns, to really get a feel for how the exponents work. I haven't done the lesson with them yet, but following is my plan. Background InformationI am guessing that if you are reading this you are a middle or high school math teacher. Before I share my lesson with you, I want to share a lesson from the primary classroom that inspired me.
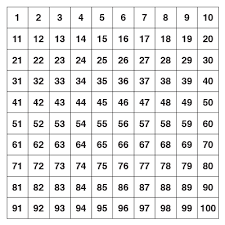
While scrolling through Twitter, I have come across the fun activities that others have shared of puzzles from the hundreds chart where students have to fill in missing numbers in scattered places of the chart. I love how the activity increases the thinking and adds some play to the learning of the numbers from 1 to 100. 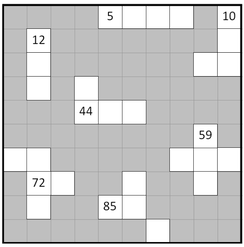 My lesson.Depending on where we left off the day before, this lesson may begin with consolidating from the intro lesson. Also, it may need to include talking about what to put in the meaningful notes (this is something I don't normally do, but it will give me a good idea of what they did and didn't learn from the day before).
Ultimately I want the students to become familiar with this chart, with how it moves horizontally and vertically. One extension at this point could be to ask them to continue the rows and columns (if it can be done).
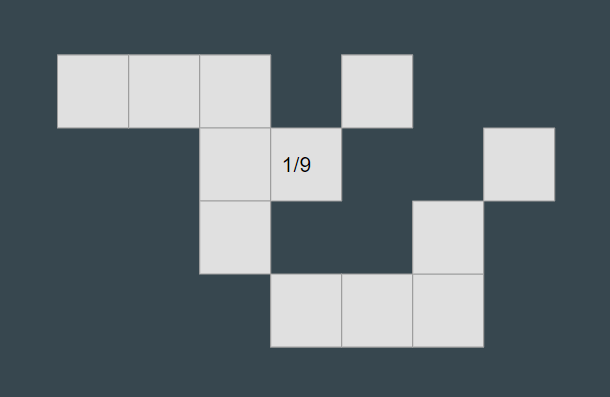
Some things I have learned from practicing this lesson on groups of teachers: 1) There is more than one way to fill this in. I was going to fix that by putting another clue in a box, but now I like it because it gives me an extension for the groups that finish quicker than others ("what's another way you could have filled this in?") 2) Students will take a long time reconstructing the grid of the puzzle on the whiteboards. You will save a lot of time if you print this off, put it in a plastic sleeve and tape it to the board Reflection.I really liked how this lesson went with teacher groups I have practiced it with. There were rich discussions amongst math teachers who are experienced with exponents, so I imagine it will be even more beneficial with students learning about the exponents. I also think I will print several different puzzles and use them as quick tasks at the beginning of the class for continued learning and review.
0 Comments
Note: this is a simply designed lesson focused on the Thinking Classroom (TC) structure. I left out the commentary that would explain the teacher moves that go with the TC and how to run a "What do you Notice". The goal for students is specific, factor sum and difference of cubes. Objectives:
~Preknowledge:
Lesson: What do you notice: factorizations of difference of squares (focus on the factors contain the square root of the original terms) 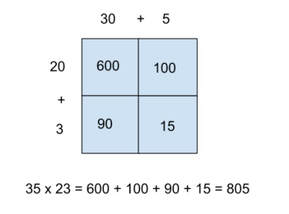 What do you notice: factorizations of sum and difference of cubes (focus on the first factor and how it is the cube roots of the original terms, the contents of the 2nd factor are not important until they figure it out during the TC portion) 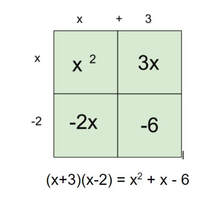 Move students to the whiteboards in random groups. Give one problem at a time where students figure out the factoring. 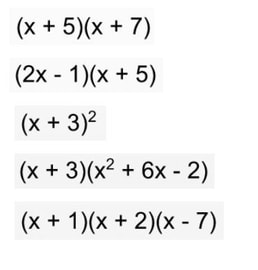 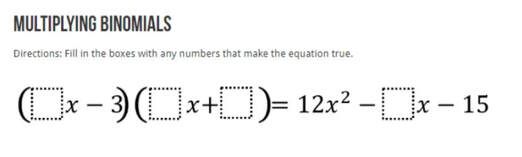 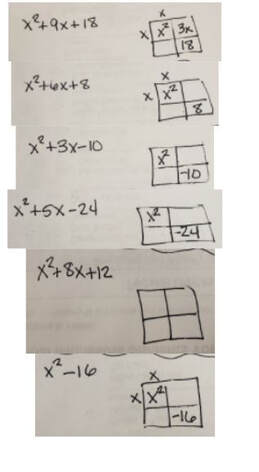 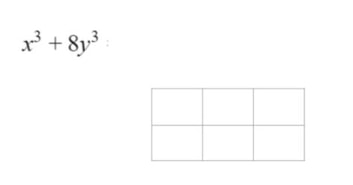 The last problem needs to have a monomial factored out first. 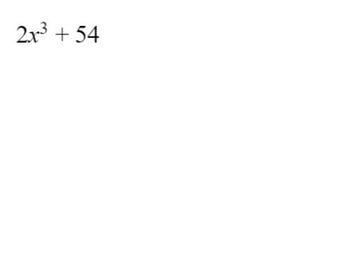 Finish with students taking notes on what they learned.
Final Thoughts: I am not sure if giving the students a 2 by 3 box to start with is too much scaffolding. I will play around with this in the future. Here are the google slides I used for distance learning. The images are ready to be copy/pasted in the jamboard. I keep seeing Sara Vanderwerf tell people on Twitter that I have some great thinking on this. So I decided I need to blog about my ideas so that I have something I can share with people. (I do not claim to be the best or know the best for all of this, I am just sharing my ideas). First off, my decisions on how I am teaching, whether in the classroom or from a distance are always founded in the Thinking Classroom. This is a set of elements that were researched and organized by Peter Liljedahl. Since I have built my classroom into a Thinking Classroom, my class has become a student-centered, engaged room that gets kids thinking and motivated to figure things out for themselves while also helping each other. If you are not familiar with the Thinking Classroom, I am sharing my google slides and recording of a presentation I did with MDE and MCTM this summer. MDE is working on making the presentation accessible, but in the meantime, the raw recording is below. Link --> Google Slides: The Thinking Classroom Distance Learning Last Spring My school is 1-to-1 chromebooks and we were able to get internet to every home. Most of what I did was Synchronous. Although what I did can be done using other platforms and technology, here is my list:
Here is a video of what I did in the Spring and what I plan to do during Virtual days (every Wednesday for my school, we are hybrid the other days) Link --> Google Slides Hybrid Learning My school is starting with hybrid learning in the high school. I am intrigued to try it, but have a few worries about the execution. We will see. My goal is to still have a Thinking Classroom. I will be blending much of what I do in the classroom and what I did during distance learning. I will be using:
My school put together a little video showing what our hybrid model will look like. It also shows how the OWL works. You can see it here. Here is a video that explains more of my plans for hybrid. Asynchronous Learning Although this is not something that I have to do, I have some ideas. Thanks to my friend, May Vang Swanson, they are even better than what I was thinking on my own. My goal, as always, is to do as much as I can with the Thinking Classroom. Here is my list of what I would use:
As you can see above, one thing that I would add to what I use is Flipgrid. From what I have heard from May and others, it would very much help with making this student-friendly and as mush student discourse as you can get asynchronously. Here is a video explaining what I would imagine Asynchronous would look like. Link ---> Google Slides I hope this is able to help spark some ideas for your classroom. I do not claim to be a know-it-all for technology. So, if you have a great app, website, or resource that would help someone that cannot use what I have used, please share it in the comments.
Manipulatives I am a huge advocate of using manipulative at all levels of mathematics. During a pandemic, we have some challenges:
Good luck to everyone this year. If you would like to visit or as a question, feel free to add a comment, email me ([email protected]) or find me on twitter (@strom_win). Just like my Algebra 1 class, my Algebra 2 class is looking at the end of the quarter, year, distance learning, and chapter 10. A test just doesn't feel right. So I have decided to have the students complete a project based on sequences. There are so many great things that they could do, I have found it difficult to pick just a couple. I have settled on 5 projects, the students will pick one to do that interests them. The projects are: Dragon Fractals Patterns on a Grid Serpinski's Triangle Spirolaterals Visual Patterns I had a sixth project, Artwork Copycat, but decided to not give it to the students. In the end, I didn't feel like it analyzed the sequences enough. Dragon Fractals: I first came across this idea looking at the wonderful math art challenge website by Annie Perkins. I was intrigued by the paper folding and how you could develop the fractal by drawing on the previous iteration. I played with it for days, even doing it in spare moments during my zoom lessons. I hope that some of my students will find it just as interesting. If we were in class, I would love to explore the connection between the paper folding and drawing the iterations. But, since this is more of an independent project and I don't have them captive in my classroom to interact with, I left that part out.  Patterns on a Grid: I first came across this idea at an art museum in Wurzburg, Germany where they had an amazing math art exhibit. The picture above is a number grid that starts in the middle and spirals out. The colored blocks are prime numbers. It did not occur to me to do this with other patterns until I was thinking about doing these projects. I had a start to a project with this idea when I stumbled upon Megan's Sprials in Annie Perkin's math art challenge. The rest, as they say, is history. It is quite interesting how the layout of the number grid and the coloring of the pattern can give a design. I highly recommend playing around with this. Serpinski's Triangle: Who doesn't love a good session with Serpinki's Triangle. It is such a fun fractal and lends itself so well to sequences. I love the idea of doing the 3D version of it and I really hope I have a student or two that will do it. I am also excited to sneak in a little bit of Pascal's Triangle. I did a different version of the 3D card with a class on Valentines day a couple years ago. Instead of straight lines, we did the top part of hearts. (I am secretly hoping to receive a card or two from my students). Spirolaterals: Have I mentioned Annie Perkins' website with math art challenges? Well, this one comes from there too! I actually saw it first when Annie tweeted about it. Of course, it screamed sequences and I had to include it. It was fun to play around with the idea. I am hoping to play around with it more after school is out.  Visual Patterns: It wasn't that long ago that I was visiting with some teachers and they said that every math teacher should know who Fawn Nguyen is. Well, I didn't. So I figured I should find out, and now here I am, a fan girl. One of the things Fawn has brought to all of us is her visual patterns website. When I first looked at it, I didn't do anything with it because I didn't now what to do. After attending Fawn's workshop, I have become an avid user of visual patterns. To start the sequence chapter, I had my students do many visual patterns and then used them to introduce notation and concepts of arithmetic and geometric. It also helped us with being able to find the expressions. It seems fitting that one of the projects is playing with visual patterns. I am especially excited for this project because of the fun I had with my daughters creating a tiktok. Between the quarantine and being 13 years old, it can be tough to find things that my oldest daughter and I can enjoy together. We had so many laughs creating the video, I am hoping my students will enjoy doing something similar.
 Artwork Copycat:
And then there is the one that didn't make the final cut. Which I am somewhat sad about. In 2016, I went on an amazing trip to Germany. It was a week-long school for math education researchers. My cup was filled from so many spouts: teaching math, traveling to Germany, exploring another culture, and visiting with math teachers from so many countries. One of our activities for the week was to visit a math art exhibit. Looking back on pictures, there were two art pieces that could be used to explore sequences. I am especially intrigued by the bright colored geometric design. Once you start exploring it, you see that it is a geometric sequence with a common ratio of 2. Trying to recreate it proved to be a fun, artistic challenge. I chose not to include it just because it wasn't quite as much sequence work as the rest and it didn't feel as rigorous as the others. I really want the projects to have the same amount of work and "value". That about covers it all. Please feel free to use any of these projects. I hope to save someone out there some work. Wishing everyone a good ending to the 2019-2020 school year. Objectives:
~Preknowledge:
The problems I chose (in order):
To start, I had all the students join me at the front of the room to discuss our plans. I told them that I was going to give them a problem that I want them to factor using "the box". When they are all done, we are going to discuss their solutions. Then I would give them two more problems to do. I handed out the cards that randomly groups them on the boards and they got to work on the first problem. 2x^2+14x+24 Since they have played a little bit with have an a-value other than 1, they went right to work factoring with a 2x and x on the outside of the box. 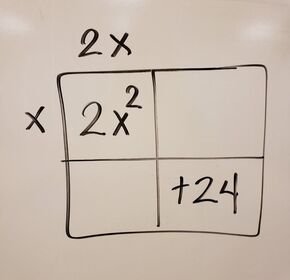 There were two answers that came out of the groups: (2x+6)(x+4) and (2x+8)(x+3) Since some groups finished quicker than others, I challenged them to find another solution (I told them there were 3 solutions). When the groups finished with at least one solution, I called the class to look at two different groups' work. They decided that both solutions were done correctly. I questioned how there could be two answers and challenged them to return to their boards to make sense of it. Most groups connected that dividing the factor with the 2x by 2 would give the other factor. (see image below) 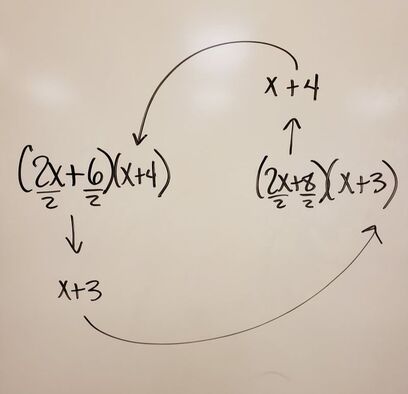 I took this opportunity to explain that we will FACTOR out a 2 instead of divide by 2, which means we will write the two in front of the factorization. I then also showed them what would happen if we factored out the 2 right away, and then factored the quadratic. We discussed the efficiency in doing that first. To wrap up, we agreed that 2(x+4)(x+3) was the complete factorization. (I also connected it to prime factorization from grade school: 20=2*2*5)
3x^2+18x+24 The students went back to their boards and I wrote this quadratic on the board. I chose this one so that it wasn't a 2 that got factored out, but I thought having a constant of 24 again would be interesting. (It turns out to not be interesting). This went quickly, the students factored out the 3 and then quickly factored the quadratic into two binomials. 2x^2+19x+24 I purposely gave them this one that does not have a monomial to factor out. I wanted to see what they would do and make sure they saw that not all quadratics with a non-one a-value would factor out a monomial. They started by trying to factor out a 2, but I heard discussions about being uncomfortable with the decimal coefficient that remained. They quickly scrapped that method and went right back to factoring using the area model. The groups all got (2x+3)(x+8). We wrapped up the board work by discussing why this factorization was different than the ones they originally got with the first problem (how they could factor out a 2 from their linear factor, but can't with this one). The remainder of the hour was spent practicing different problems. It went smoothly and any of their questions were discussed in their groups and figured out on their own. It was fun to listen to their discussions and reasoning. I wanted to teach a lesson on using systems of linear equations to solve an interesting problem instead of the typical gym membership problems. I turned to the MTBoS search engine, but struck out (I was being really picky). I did, however, run across Christopher Danielson's "Oreo Manifesto" and found my inspiration. Then I found a picture at residentevents.com that helped inspire the rest of the problem. 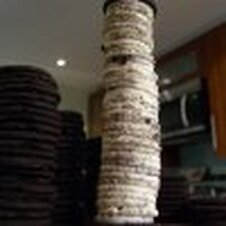 To spark interest and start the problem solving process, I started the lesson by showing the picture of the oreo stack on my smartboard. I had the students notice and wonder while I wrote what they said on the board. I then shared two things that I wondered: 1) How many calories would this oreo stack be? 2) How many grams would it be? In order to answer these questions, we brainstormed some things we might need to know. We also had a conversation about if the stufs in the oreo stack were from regular oreos or double stuf oreos. We decided to say that they were from regular oreos, but some were convinced that they were from double stuf. I followed up by giving the students the following image.  Note: At this point, the students have brainstormed, but I have not told them what they need or how to answer the questions (in reality, I have not told them anything). I used the public brainstorming as a way to let them share ideas, but didn't want to do the thinking for them.
I randomly grouped the students together with cards and sent them to the whiteboards. We decided to work on the first question, "How many calories is the stack?" I let the students play around with the problem for a while. They struggled, which I anticipated. It became the headache and they wanted the aspirin (see Dan Meyer). As they worked, I visited each group to hear their ideas and thoughts. After a few minutes, I called the class together to one of the white boards. I explained that something that helps get a problem going is figuring out what the variables are. "What don't you know that you want to know?" We wanted to know how many calories the stack is. But what do we need to know more specifically? 1) How many calories is a wafer 2) How many calories is a stuf I sent the students back to their boards with the mission to now create equations. Once again, they struggled, but kept trying. I walked around to the groups and visited with them about what they were trying. (When talking with the students, it is my goal to learn what they understand and then move them forward with careful questioning. My rule is that I cannot tell them anything, I must ask a question) After a while, I called the class back together to talk about how to build the equations (aspirin to their headache again). They went back to their boards, wrote their equations and found how many calories were in the stack. (They have already learned how to solve systems). When each group answered the first question, I asked them to work on the second equation, "How many grams is the stack?" They jumped in with enthusiasm and worked until the end of the hour. Some finished, some did not. Either way, we all ate oreos before leaving for the day! To follow up, the next day, we worked on the typical word problems: from the situations, we constructed equations and solved the systems. I have always been frustrated with teaching zero exponents and negative exponents. It is difficult to really get the students to understand. But I think I have finally found a good lesson! Of course, it includes visuals that students can experiment with. When we were done with it, I was pleasantly surprised when, in answer to the question, "What is a^0?", both classes answered, "the division by itself." (Which was not a phrase I used in class, but a phrase they created from their exploration).
I struggled at the beginning of the lesson to get them to forget about the exponent rules they memorized and really understand what we were exploring. But, through the process, they forgot about the memorized rules, and embraced the math we were doing. I count this lesson a success! You can get the lesson here. First handout for Stand and Talk Collection of various patterns for groups to work with I tried two different things this year to celebrate Pi Day in my classroom. My high school students have already done the string to measure the circumference and diameter in previous years. I wanted to do something more active than watching youtube videos. So I watched for ideas on twitter. (If you are not a twitter user, please consider getting an account and trying it!) The first activity I found was Pi Poems. This came from the great blog by Eric Curts. He has so many great technology ideas for various subject areas. (Here is the Pi Poem blog post). The structure of a Pi Poem is that the number of letters in the word match the corresponding digit in Pi. The first word is 3-letters long, the second is 1-letter long, the third is 4 letters long and so on. I teamed up with the ELA department for this assignment. We gave them some guidelines like: the poem had to be Pi-themed. Basically, it had to be about pi or something circular. They also had to create a final product that was creative. (We are going to display their poems at our spring Art Show!) Here is the google doc we used to give them their guidelines. We also supplied the students with Eric Curts' spreadsheet to help keep track letters in the words. I loved the resulting poems. They were unique and clever. See below for some of my favorites! The second activity I did was a twitter project I found on Alice Keelers blog. The original activity was designed by Ashley Fort for historical figures as the subject. I tweaked it to be about pi. My students were told to research pi, its history, and its uses. On Pi Day, I gave them the template and final instructions to make a mock twitter page for pi. They had to come up with a handle, the bio, a picture, and then tweet as pi and also as someone tweeting to pi. I enjoyed what they came up with, however, we had a little problem with just copy and pasting what they found on websites. When they shared their work with the rest of the class, we had a good discussion about plagiarism and how to appropriately share someone else's words. Here is the result of that day. Some of the Pi Poems from March 14th, 2018
It is the age old frustration for anyone teaching math. How do we get kids to be better at solving word problems? There are many answers out there; many opinions. But let's be honest, many of us are hoping there is an easy answer that won't require a new curriculum, hours of prep and completely revamping our teaching methods. Although I think that all three things are often needed, it is not reality. About a year ago, I discovered I had effectively isolated my professional life to within the four walls of my classroom since 2009. I think it was a combination of raising children and wearing too many hats within my school-district. Luckily, I broke free! And one of the first things I learned was about the simple, but impactful, question "What do you Notice?". Really Quick Rant: How is this not the cornerstone of preservice teacher's education? In case you are like I was a year ago, "What do you Notice?" is a question you ask students whenever you want them to notice things, expand their thinking, or take time before they dive into a question. Basically, don't notice/say anything that the kids can notice/say. If you haven't seen it, watch Annie Fetter's ignite video
Applying this to word problems has completely changed my classroom.
Whenever we are going to work on a word problem, I REMOVE THE QUESTION. How many times have you asked or been asked, "How do I get kids to spend more time on word problems before just 'doing' the math they think it wants?"? It is simple, remove the question. Next: Ask the kids what they notice. When you are first doing this, it is important to MODEL, MODEL, MODEL. Have the students popcorn out what they notice and write it all on the board. And I mean ALL. Give each and every thing that is noticed validation by writing it on the board. You are letting EVERY student know that what they notice is valuable and encouraging them to keep noticing. When you have exhausted everything that can be noticed, ask the kids to come up with the question that can be asked and then solve it. Because they just spent so much time noticing, they are typically ready to do the math without the support they would have required in the past. You can/should extend this to be done individually also. Take a piece of paper and put the problem in the middle with a circle around it (no question again). Have the students write everything they can notice around the circle in a web-format (concept map). Then at the bottom ask them to come up with a question and solve it. What can you expect:
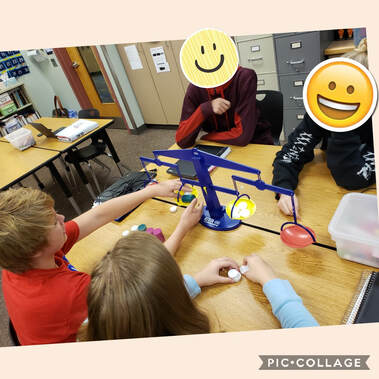
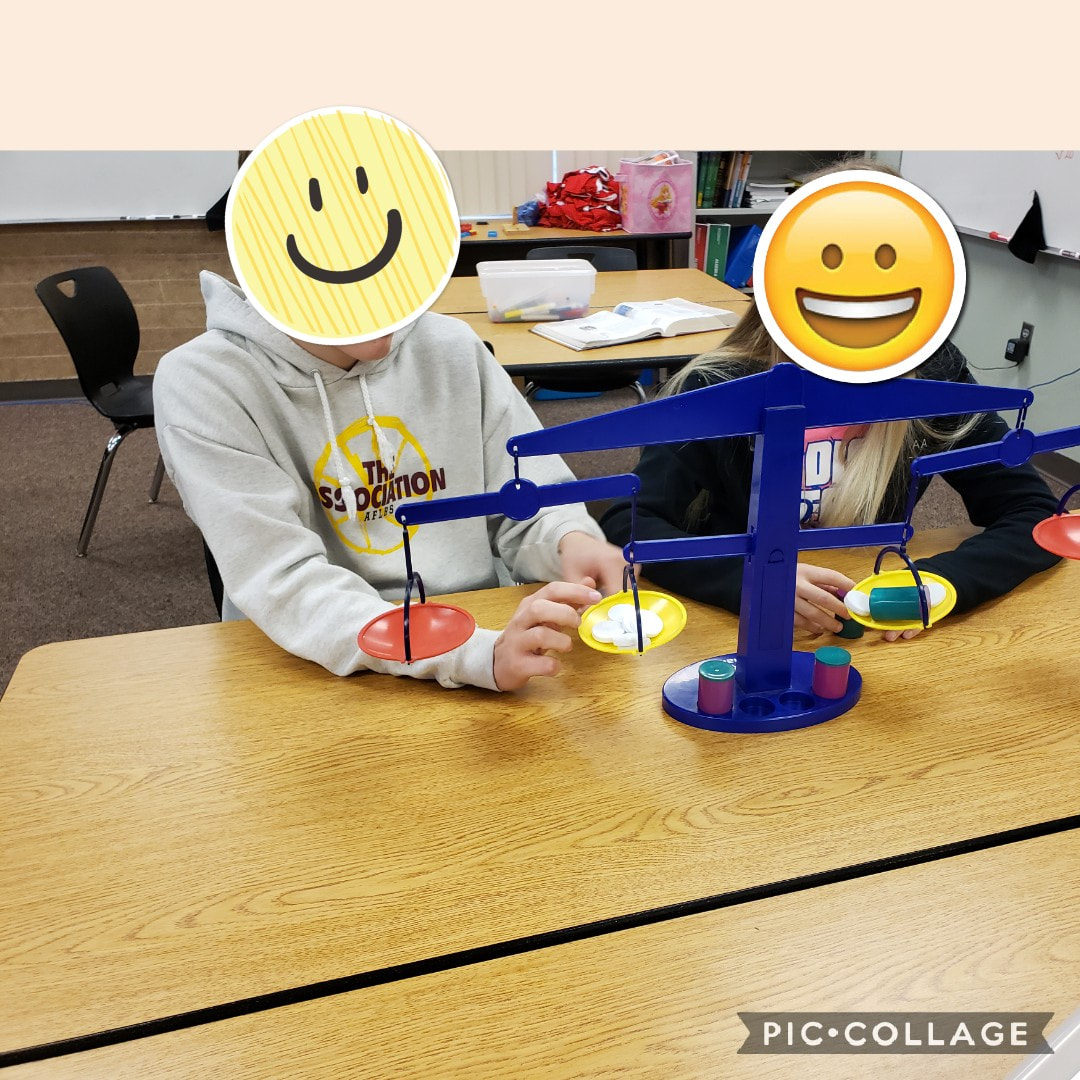
In reflection, it is embarrassing that this was not an intuitive thing to do with my students. Instead, I was always reading the problem outloud, then jumping to the question and asking the students what information they need. I would then try to get them to dissect the information, but they were too eager to just do math with the numbers given and get the problem done. By establishing this model, I am hoping students will be more apt to do this on their own. And I am hoping to see a change in how they attack their state test in the spring. Goals: 1) Students understand what they are doing when they solve equations, beyond memorized steps 2) Students see/understand the efficiency of getting rid of the constants first 3) Students know they can multiply/divide first, but also understand that they have to do it to the entire side, not just the term with the variable 4) Students continue to keep their equations balanced 5) Students continue to make connections between solving equations abstractly and solving with Algeblocks Lesson: Day 1: I began this lesson with a number talk. The idea is to give them one that they have to do in a couple steps and then relate the lesson back to it at the end of the hour. 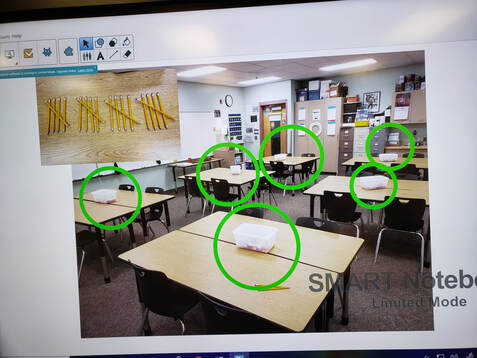 Number Talk: (See picture above) I have six tables. I told the kids that I had 20 pencils that I wanted to put in the resource boxes on the tables. If I put the same number of pencils in each box, how many did I put in each box? The students shared about 5 different solutions and we went on to the lesson. (I wish I had taken a picture of these. I thought I did, but cannot find it any where on my phone). Next I wanted the students to explore solving a two-step equation. I decided to use the balance scales because I wanted the students to see it being balanced or unbalanced after their choice of operation. (We have been talking a lot about how the equal sign in an equation means that it is balanced). The equation I used was 2x+3=9. My paraprofessional and I set up the balance scales at each table. Before we started solving, I asked the students what they noticed about the scales. This step is something I was missing in the past. It is important to take the time to make sure students have studied what is in front of them before asking them to make decisions on how to solve it. They noticed: "There are two canisters" (We wondered and confirmed that they were the same weight and worth) "There are 3 white tokens with the canisters" "There are 9 white tokens on the other side" "The two sides are balanced, so they weigh the same" "The equation is 2x+3=9" At this point I told the students that I wanted them to figure out how much ONE canister weighs, but it is important that they "have a math reason for what they are doing". (There are probably better ways of saying this, but my ninth graders nodded their heads and got busy, so it must have made sense to them).
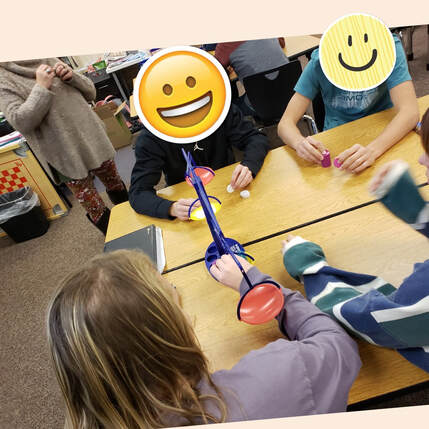
 There was great discussion within the groups on how to solve the equation. They talked about making sure they did the same thing on both sides and that they needed to keep it balanced. They pretty quickly decided to remove the three tokens from each side. Dividing by 2 was a bit trickier with the balance scales, for two reasons. First, when we worked with Algeblocks to do this with one-step equations, you could easily split the pieces into two groups. But the pans of the balance scale are not big enough to do this. So the students had to remove one of the two groups. Second, because of the actual balancing of the scales, they could "cheat" to figure out how many tokens to leave on the right. They would just remove one token at a time until it was balanced, instead of splitting the tokens in half and removing one of those groups. At this point I had to have them put the pieces back on and ask them to talk me through their steps. To wrap up this problem, I had the students set up their scales again with the same equation and I wrote the equation on the board. As a whole class, they talked me through their steps and then we discussed how we could write the same thing with the equation. See our work below. 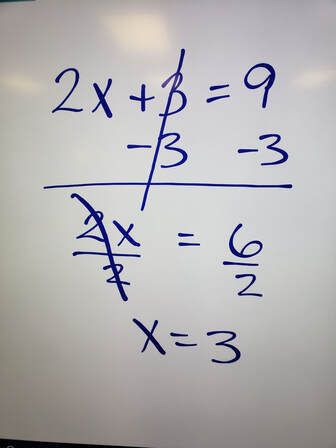 I next wanted to make a point about the efficiency of removing the constants first, but also point out that you could divide/multiply first (as long as you do it correctly). I chose to have the students solve the equation 2x+4=10 on the balance scales. I wrote the equation on the board and had them set it up on their scales. Note: I made sure the value of x stayed the same so that they could just use the canisters as they were. I also chose even numbers so that they could physically divide them all by 2. My instructions to the students were: "I want you all to solve this equation on the scales. When you are done, I want you to put it back on and solve it a different way the second time. Make sure what you do to one side, you do the exact same thing to the other and make sure you keep it balanced". The students quickly solved it the first way by removing the constants (extra tokens) first and then dividing into two groups, just like the first problem. When they went to solve it a second way, one of three things happened: 1) They didn't know what to do and sat somewhat quietly 2) They tried different things and maybe ended up at the answer but with sketchy math steps (see previous trick from first problem) 3) They did well with dividing both sides by 2 first and figuring out that you also have to divide the four tokens. Once again, I had all the groups put the equation back on their scales. As a class, we walked through the first solution while they did the scales and I did the algebra on the board. Then I had them put the equation back on the scales so that we could talk about the second step. Knowing that very few figured it out, I decided to try to lead the groups to the second method. One of my favorite questions to ask during these solving equations lessons is "What is our goal?". I find students need to be reminded that they are trying to solve for x, which means they are trying to get x by itself. So I asked that and then followed with, "What are the two things we need to get rid of?" Students knew they wanted to get rid of the 2 and the 4. They also realized at this point, that if they got rid of the 4 first last time, they will want to get rid of the 2. To purposely mislead them, I showed dividing the 2x by 2 and the 10 by 2 on the board (I did NOT divide the 4 by 2). I wanted them to see the unbalanced result on the balance scale. It was interesting to see the reactions of students. Some eagerly went to the scales to do it, but there were a few that started to protest. I quietly nodded in agreement to them and they quickly accepted my choice (I am thankful that they have gotten to know me well enough by now to trust my teaching moves). The students pretty quickly realized the mistake of not dividing the four. It was great to hear their conversations of why they were not balanced and how to fix it. We reconvened on the board and discussed as a class what happened. They did a great job justifying why we need to divide EVERYTHING, not just the 2x and 10. You can see our work below. 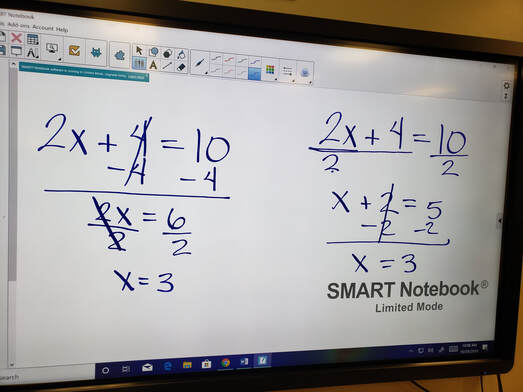 But there was an important discussion to have still. Which method should we use? When should we use each method? Is there a more efficient method? So, we went back to our first problem, 2x+3=9. I had the students set it back up and then told them to solve it by dividing first. I barely started to walk around the room before the students started protesting. I challenged them to keep working it out, but it didn't last long before many were giving up. We gathered together as a class again to discuss what their issues were. Although they knew what they wanted to do, it was impossible to split a token in half, therefor they could not solve this problem this way on the balance scales. We did talk about how we could do it on paper, but it would be more efficient to do it by getting rid of the constant first. One of my favorite parts of this lesson is bringing it back to the number talk from the beginning. I asked the class to look at the solutions, which I purposely left on the board. I asked, "Which one of the solutions took away the constant first?". The surprised reactions of the students was fun to listen to as they realized that they did ALGEBRA during their NUMBER talk and that they naturally do algebra, even without writing a variable. At this point, the class period was done. I really wanted to get out the Algeblock mats to have them do some equations with those. I wanted each student to be active with physically manipulating the equations. However, being out of time, I just gave them 6 problems to solve on paper as homework. Day 2: I wasn't quite sure how this day was going to go. Because I didn't get to have the students work with the Algeblocks the day before, I was prepared to do that today. But first I wanted to check how they were doing. I decided to start the class with the activity My Favorite No. Each student got an index card and I wrote the problem 8=3x+2 on the board, purposely writing the x on the right. The kids finished somewhat quickly and I collected the cards. I was pleased to see that most of the solutions were done correctly. There were just a couple that had subtracting mistakes, but nothing incorrect algebraically. So, I decided to take the activity in a little different direction. I pretended that the following was an incorrect solution from someone in the class: 8=3x+2 8=5x 8/5 = x Instead of asking what was right and then analyzing the mistake, I had them visit within their table groups to answer the following questions: Pretend you are the teacher, 1) Figure out why they did what they did 2) What would you say to help them understand why they shouldn't do that? 3) How can you use Algeblocks to help? The students did a great job talking through the task. When we discussed it together as a class, I played the role of the confused student, asking questions that I have been asked myself. For example, one student said that "2 isn't an x, so you cannot add it to the 3". I said, "I know 2 isn't an x, but 3 isn't either, so why can't I add them together?". Soap box: When someone understands algebra, 3x and 2 are obviously different things, but when a student just sees algebra as just numbers and letters, it is completely logical to add 3 and 2, they are both numbers. That is what I love about Algeblocks. They force us to analyze what 3x means (3 groups of x, which would be 3 long, yellow blocks) and that 2 is 2 units or 2 green centimeter cubes. When they can make a visual representation of the expression, they can actually SEE that they are not the same thing. However, this is not automatic either. It takes time to establish this, and it may take longer for some students than others. Be patient and willing to put in the time. The rewards are worth it. And this is how our conversation went. They were able to tell me that 3x means 3 groups of x, not "3 green guys" (which is how we refer to the green centimeter cubes now). So we have 3 yellow blocks and 2 small green blocks. This cannot be simplified any further, so they cannot be written as 5x (which would be 5 yellow blocks). I also wanted this lesson to include talk about simplifying a side before solving. Not that you have to, but we needed to make sure they knew how. I posed the following mistake: 2x + 3 + x = 9 -x -x x + 3 = 9 (basically, the student subtracted x twice on the same side) Class discussion included talk about keeping the equation balanced and that you cannot subtract x on the same side twice. We also looked at the Algeblocks and discussed how we could just combine the x's since they were on the same side. At this point I was please with where the students were at and wanted them to practice. So we spent the rest of the class period practicing problems as an assignment. |
AuthorI teach mathematics for grades 7-12. Teaching mathematics is my passion. Archives
August 2022
Categories
All
|


 RSS Feed
