My Thoughts, Ideas, and Observations |

|
|
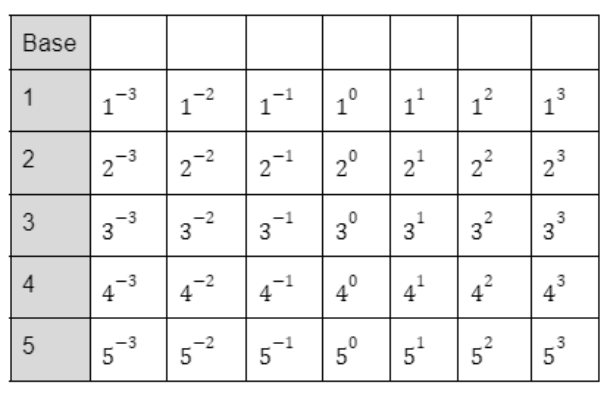
I love my lesson on introducing negative and zero exponents now that I added in the visuals. Check out the lesson here. I also like the lesson I do after where I use smudge math to get them to think about what the exponents should be. BUT, I have come to realize that I need a lesson between the two. My students need more time to work with negative and zero exponents, to play with the patterns, to really get a feel for how the exponents work. I haven't done the lesson with them yet, but following is my plan. Background InformationI am guessing that if you are reading this you are a middle or high school math teacher. Before I share my lesson with you, I want to share a lesson from the primary classroom that inspired me.
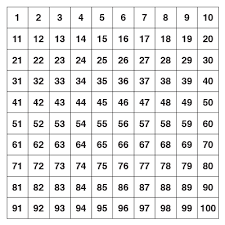
While scrolling through Twitter, I have come across the fun activities that others have shared of puzzles from the hundreds chart where students have to fill in missing numbers in scattered places of the chart. I love how the activity increases the thinking and adds some play to the learning of the numbers from 1 to 100. 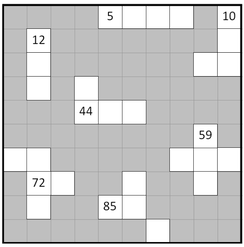 My lesson.Depending on where we left off the day before, this lesson may begin with consolidating from the intro lesson. Also, it may need to include talking about what to put in the meaningful notes (this is something I don't normally do, but it will give me a good idea of what they did and didn't learn from the day before).
Ultimately I want the students to become familiar with this chart, with how it moves horizontally and vertically. One extension at this point could be to ask them to continue the rows and columns (if it can be done).
Some things I have learned from practicing this lesson on groups of teachers: 1) There is more than one way to fill this in. I was going to fix that by putting another clue in a box, but now I like it because it gives me an extension for the groups that finish quicker than others ("what's another way you could have filled this in?") 2) Students will take a long time reconstructing the grid of the puzzle on the whiteboards. You will save a lot of time if you print this off, put it in a plastic sleeve and tape it to the board Reflection.I really liked how this lesson went with teacher groups I have practiced it with. There were rich discussions amongst math teachers who are experienced with exponents, so I imagine it will be even more beneficial with students learning about the exponents. I also think I will print several different puzzles and use them as quick tasks at the beginning of the class for continued learning and review.
0 Comments
Note: this is a simply designed lesson focused on the Thinking Classroom (TC) structure. I left out the commentary that would explain the teacher moves that go with the TC and how to run a "What do you Notice". The goal for students is specific, factor sum and difference of cubes. Objectives:
~Preknowledge:
Lesson: What do you notice: factorizations of difference of squares (focus on the factors contain the square root of the original terms)  What do you notice: factorizations of sum and difference of cubes (focus on the first factor and how it is the cube roots of the original terms, the contents of the 2nd factor are not important until they figure it out during the TC portion) 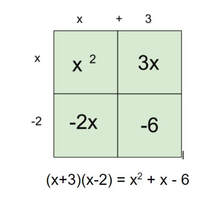 Move students to the whiteboards in random groups. Give one problem at a time where students figure out the factoring.  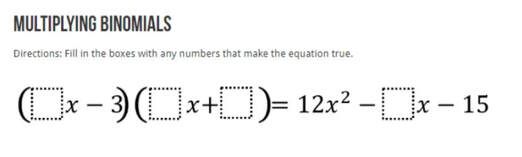 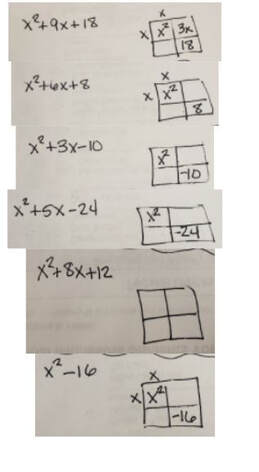 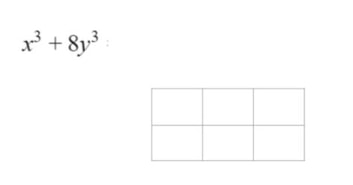 The last problem needs to have a monomial factored out first. 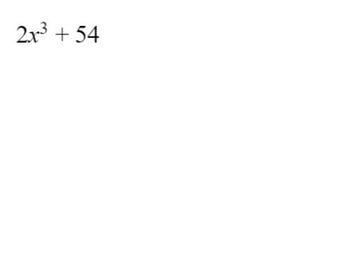 Finish with students taking notes on what they learned.
Final Thoughts: I am not sure if giving the students a 2 by 3 box to start with is too much scaffolding. I will play around with this in the future. Here are the google slides I used for distance learning. The images are ready to be copy/pasted in the jamboard. I keep seeing Sara Vanderwerf tell people on Twitter that I have some great thinking on this. So I decided I need to blog about my ideas so that I have something I can share with people. (I do not claim to be the best or know the best for all of this, I am just sharing my ideas). First off, my decisions on how I am teaching, whether in the classroom or from a distance are always founded in the Thinking Classroom. This is a set of elements that were researched and organized by Peter Liljedahl. Since I have built my classroom into a Thinking Classroom, my class has become a student-centered, engaged room that gets kids thinking and motivated to figure things out for themselves while also helping each other. If you are not familiar with the Thinking Classroom, I am sharing my google slides and recording of a presentation I did with MDE and MCTM this summer. MDE is working on making the presentation accessible, but in the meantime, the raw recording is below. Link --> Google Slides: The Thinking Classroom Distance Learning Last Spring My school is 1-to-1 chromebooks and we were able to get internet to every home. Most of what I did was Synchronous. Although what I did can be done using other platforms and technology, here is my list:
Here is a video of what I did in the Spring and what I plan to do during Virtual days (every Wednesday for my school, we are hybrid the other days) Link --> Google Slides Hybrid Learning My school is starting with hybrid learning in the high school. I am intrigued to try it, but have a few worries about the execution. We will see. My goal is to still have a Thinking Classroom. I will be blending much of what I do in the classroom and what I did during distance learning. I will be using:
My school put together a little video showing what our hybrid model will look like. It also shows how the OWL works. You can see it here. Here is a video that explains more of my plans for hybrid. Asynchronous Learning Although this is not something that I have to do, I have some ideas. Thanks to my friend, May Vang Swanson, they are even better than what I was thinking on my own. My goal, as always, is to do as much as I can with the Thinking Classroom. Here is my list of what I would use:
As you can see above, one thing that I would add to what I use is Flipgrid. From what I have heard from May and others, it would very much help with making this student-friendly and as mush student discourse as you can get asynchronously. Here is a video explaining what I would imagine Asynchronous would look like. Link ---> Google Slides I hope this is able to help spark some ideas for your classroom. I do not claim to be a know-it-all for technology. So, if you have a great app, website, or resource that would help someone that cannot use what I have used, please share it in the comments.
Manipulatives I am a huge advocate of using manipulative at all levels of mathematics. During a pandemic, we have some challenges:
Good luck to everyone this year. If you would like to visit or as a question, feel free to add a comment, email me ([email protected]) or find me on twitter (@strom_win). Objectives:
~Preknowledge:
The problems I chose (in order):
To start, I had all the students join me at the front of the room to discuss our plans. I told them that I was going to give them a problem that I want them to factor using "the box". When they are all done, we are going to discuss their solutions. Then I would give them two more problems to do. I handed out the cards that randomly groups them on the boards and they got to work on the first problem. 2x^2+14x+24 Since they have played a little bit with have an a-value other than 1, they went right to work factoring with a 2x and x on the outside of the box. 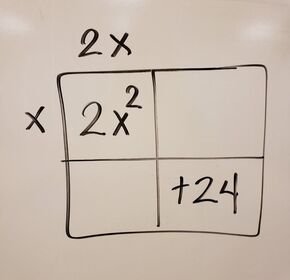 There were two answers that came out of the groups: (2x+6)(x+4) and (2x+8)(x+3) Since some groups finished quicker than others, I challenged them to find another solution (I told them there were 3 solutions). When the groups finished with at least one solution, I called the class to look at two different groups' work. They decided that both solutions were done correctly. I questioned how there could be two answers and challenged them to return to their boards to make sense of it. Most groups connected that dividing the factor with the 2x by 2 would give the other factor. (see image below) 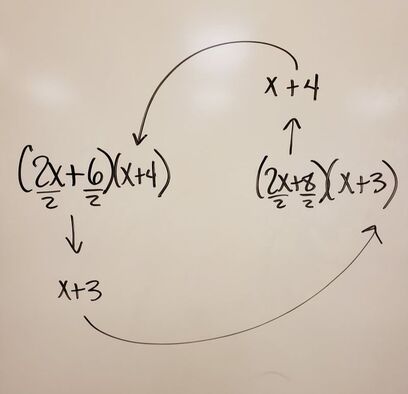 I took this opportunity to explain that we will FACTOR out a 2 instead of divide by 2, which means we will write the two in front of the factorization. I then also showed them what would happen if we factored out the 2 right away, and then factored the quadratic. We discussed the efficiency in doing that first. To wrap up, we agreed that 2(x+4)(x+3) was the complete factorization. (I also connected it to prime factorization from grade school: 20=2*2*5)
3x^2+18x+24 The students went back to their boards and I wrote this quadratic on the board. I chose this one so that it wasn't a 2 that got factored out, but I thought having a constant of 24 again would be interesting. (It turns out to not be interesting). This went quickly, the students factored out the 3 and then quickly factored the quadratic into two binomials. 2x^2+19x+24 I purposely gave them this one that does not have a monomial to factor out. I wanted to see what they would do and make sure they saw that not all quadratics with a non-one a-value would factor out a monomial. They started by trying to factor out a 2, but I heard discussions about being uncomfortable with the decimal coefficient that remained. They quickly scrapped that method and went right back to factoring using the area model. The groups all got (2x+3)(x+8). We wrapped up the board work by discussing why this factorization was different than the ones they originally got with the first problem (how they could factor out a 2 from their linear factor, but can't with this one). The remainder of the hour was spent practicing different problems. It went smoothly and any of their questions were discussed in their groups and figured out on their own. It was fun to listen to their discussions and reasoning. I wanted to teach a lesson on using systems of linear equations to solve an interesting problem instead of the typical gym membership problems. I turned to the MTBoS search engine, but struck out (I was being really picky). I did, however, run across Christopher Danielson's "Oreo Manifesto" and found my inspiration. Then I found a picture at residentevents.com that helped inspire the rest of the problem. 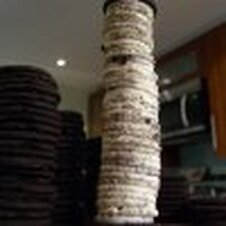 To spark interest and start the problem solving process, I started the lesson by showing the picture of the oreo stack on my smartboard. I had the students notice and wonder while I wrote what they said on the board. I then shared two things that I wondered: 1) How many calories would this oreo stack be? 2) How many grams would it be? In order to answer these questions, we brainstormed some things we might need to know. We also had a conversation about if the stufs in the oreo stack were from regular oreos or double stuf oreos. We decided to say that they were from regular oreos, but some were convinced that they were from double stuf. I followed up by giving the students the following image.  Note: At this point, the students have brainstormed, but I have not told them what they need or how to answer the questions (in reality, I have not told them anything). I used the public brainstorming as a way to let them share ideas, but didn't want to do the thinking for them.
I randomly grouped the students together with cards and sent them to the whiteboards. We decided to work on the first question, "How many calories is the stack?" I let the students play around with the problem for a while. They struggled, which I anticipated. It became the headache and they wanted the aspirin (see Dan Meyer). As they worked, I visited each group to hear their ideas and thoughts. After a few minutes, I called the class together to one of the white boards. I explained that something that helps get a problem going is figuring out what the variables are. "What don't you know that you want to know?" We wanted to know how many calories the stack is. But what do we need to know more specifically? 1) How many calories is a wafer 2) How many calories is a stuf I sent the students back to their boards with the mission to now create equations. Once again, they struggled, but kept trying. I walked around to the groups and visited with them about what they were trying. (When talking with the students, it is my goal to learn what they understand and then move them forward with careful questioning. My rule is that I cannot tell them anything, I must ask a question) After a while, I called the class back together to talk about how to build the equations (aspirin to their headache again). They went back to their boards, wrote their equations and found how many calories were in the stack. (They have already learned how to solve systems). When each group answered the first question, I asked them to work on the second equation, "How many grams is the stack?" They jumped in with enthusiasm and worked until the end of the hour. Some finished, some did not. Either way, we all ate oreos before leaving for the day! To follow up, the next day, we worked on the typical word problems: from the situations, we constructed equations and solved the systems. I have always been frustrated with teaching zero exponents and negative exponents. It is difficult to really get the students to understand. But I think I have finally found a good lesson! Of course, it includes visuals that students can experiment with. When we were done with it, I was pleasantly surprised when, in answer to the question, "What is a^0?", both classes answered, "the division by itself." (Which was not a phrase I used in class, but a phrase they created from their exploration).
I struggled at the beginning of the lesson to get them to forget about the exponent rules they memorized and really understand what we were exploring. But, through the process, they forgot about the memorized rules, and embraced the math we were doing. I count this lesson a success! You can get the lesson here. First handout for Stand and Talk Collection of various patterns for groups to work with |
AuthorI teach mathematics for grades 7-12. Teaching mathematics is my passion. Archives
August 2022
Categories
All
|
 RSS Feed
